Ice Cream, Chocolate and Voice Placement

When I began teaching middle school, I faced this dilemma: voice placement. How could I listen to each student to assign them a voice part within the ensemble without intimidating my adolescent singers or spending a significant amount of class time?

My solution was simple: I taught the entire class a simple canon (“Viva la Musica,” “O Music,” and “Jubilate Deo” all worked beautifully because the range for each is only M9 or less). Then all the students stood in a circle around our classroom, singing the canon over and over. As they all sang together, I slowly walked in front of each student, smiled, and just listened for a few moments before showing each singer either one or two fingers. I had told the students in advance to make the number with their own fingers at their side so that they could remember the number I assigned them. After I heard every child, I asked everyone to show me the number they had been shown.

For the “One” students, I explained that their voices sounded like ice cream- light, “floaty,” and perhaps a little creamy. I told the “Two” students that their voices to me sounded like chocolate- rich, yummy, and filling. I placed “ice cream voices” on the soprano part, the “chocolate” voices on the alto part, and the changed voices into the respective tenor, baritone, or bass part (depending on the level of divisi we were able to achieve).

Knowing that early adolescent treble voices are versatile and should not be pigeonholed into a specific voice part, I intentionally chose quality repertoire that would not confine voice parts to a singularly low or high tessitura. Students who were in more than one ensemble with me (choir class, extracurricular honors mixed choir, and extracurricular men’s choir or women’s choir) often sang different voice parts in each ensemble. I also refused to call the parts “soprano” or “alto,” but instead referred to them as “Part One” and “Part Two.” This helped to build the confidence of the boys with unchanged voices so that they would feel less self-conscious being labeled as a “soprano,” and it also helped to reduce the dramatic diva-like symptoms of what I called “Heartbroken Soprano Syndrome [HSS].” (HSS occurs when a student who has always sung soprano, for forever and ever in her 12 years of life, is distressed when she is asked to sing a voice part other than the melody. HSS also manifests as “I can’t possibly sing as low as the Part Two students need to sing” even though the lowest note was almost always unison for Part One and Part Two – and perhaps only a B3 at that.) 😉 I’d always reassure the sufferers of HSS that this request to sing Part Two was NOT permanent and that I wanted them to try it out and check in with me every so often to let me know how they were feeling about it.

Ice cream, chocolate and voice placementBefore listening to the students sing together in the circle, I told students that I was so shy in middle school that I might have cried if asked to sing all by myself in front of my class. That’s why they were going to all sing together. (A few parents shared with me that their own  shy child had relayed my story at home, relieved that they were understood.) 🙂

After listening to my students sing, I always raved to them that I was so glad that I’d gotten to hear each of their beautiful voices and I thanked them for being brave!

How do you assign voice parts to your singers?

“My Bonnie Lies over the Ocean” game

One game I learned at my college orientation years ago was to the tune of “My Bonnie Lies over the Ocean.” You begin the song in a seated position, but when you sing a word that starts with the letter “B,” you stand. When you’re standing and continuing to sing, you sit when you sing a word that starts with the letter “B.”

For example:

My bonnie (stand) lies over the ocean,
My bonnie (sit) lies over the sea,
My bonnie (stand) lies over the ocean,
So bring (sit) back (stand) my bonnie (sit) to me

Bring (stand) back (sit)
Oh bring (stand) back (sit) my bonnie (stand) to me, to me!

Bring (sit) back (stand)
Oh bring (sit) back (stand) my bonnie (sit) to me, to me!

All ages to whom I’ve taught this – elementary age through high school – get a kick out of this game. I use it to reinforce our “posture positions” for singing:

  • Posture Position 1 is when the students are singing while standing and demonstrating beautiful body alignment for singing to maximize efficient breathing.
  • Posture Position 2 is when students are singing while seated, “standing from the waist up.”
  • Posture Position 3 is when students are seated but not singing, so they may lean back.

We talk about and demonstrate each of these different posture positions, and then we demonstrate Positions 1 and 2 with the “My Bonnie Lies over the Ocean” game. My Bonnie Lies over the Ocean

It’s one of my favorite lessons during the first week of school, and it’s a great energizer whenever students need the reminder about demonstrating beautiful body alignment while singing!

What games do you play with your students to reinforce good habits?

Simplify Attendance and Grade Entry

When I was a first year teacher, I observed one of the P.E. teachers at my school as she marked students present on her roster. Instead of checkmarks, she used dots for present students. I adopted this shortcut immediately and developed it further into my own shorthand for my gradebook. Although my district requires electronic entry of attendance and grades, I still prefer to maintain a paper version for quick reference (e.g. grading student work while waiting for an appointment or showing a missing assignment to a student while walking around my classroom).

TIP #1: When entering student attendance data on your attendance sheet (download for FREE in my store), use a single dot to indicate if a student is present or a circle if the student is absent. AttendanceCodesI then code the dot with “ED” if a student has early dismissal or I’ll fill in the circle with “TE” for Tardy-Excused or “TU” for Tardy-Unexcused.

TIP #2: When entering grades in your gradesheet (download for FREE in my store), use a single dot if a student receives full credit, the number grade if the number is less than 100%, or a circle if an assignment is not turned in. GradingCodesWhen I transfer the grades from my paper gradebook to my electronic gradebook, I highlight the circles in YELLOW so I know that I’ve entered the grade as-is. If the work is submitted within the late deadline for reduced credit but after I’ve entered the grades online, I’ll change the online grade AND use pink highlighter over the previously yellow-highlighted circle to indicate that I’ve changed the grade already.

Download my FREE rainbow-themed attendance-and-gradesheet-thumbnailAttendance and Gradesheets here at my Teachers Pay Teachers store.

What systems have you developed to help you streamline your everyday tasks?

Teacher Binder Organization Tips

TeacherBinderOrgTips-cover

My teacher binder, AKA my lifeline during the school year, contains the most important documents for my day-to-day work:

  • attendance rosters
  • student grade sheets
  • paperwork about students’ learning needs
  • students’ “All About Me” forms from the beginning of the school year
  • logs for student behavior and parent contact
  • work for absent students
  • school forms


My tips for organization:

1) Use tabbed dividers to separate the papers for each class.

table-of-contentsOn the back of the divider, I attach paperclips to the top and bottom to hold extra copies of assignments for students who are absent from class. That way, when I flip open the section for the class to take attendance, the assignment is readily available for me to hand to the student when he or she returns. Back-of-dividerBecause I teach in 3 different classrooms, it’s easier for me to hold onto handouts for my students instead of setting up a separate station in each classroom where students can go to pick up their missed work.

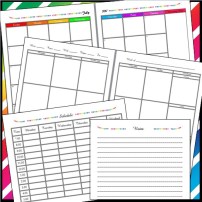
 

2) Within each class section, use brightly colored paper to divide the contents further.

Each class section in my binder is ordered:

  • Students’ attendance and grade sheets printed double-sided (FREE in my store)
  • Colored paper divider
  • Paperwork on students’ learning needs (IEPs and 504s)
  • Colored paper divider
  • Students’ “All About Me” sheets from their class syllabus
  • Colored paper divider
  • Other, for example: If a student struggles with making appropriate behavior choices, I simply jot down the date and a few notes on a piece of paper (a description of the behavior and consequences, including parent communication, if applicable), and this paper is filed with the student’s class section.
What organizational systems do you use to keep track of your student data? I would love to know your tips!

Best Advice for New Teachers in 5 Words

I have been a first-year teacher THREE times: my first real year of teaching at a middle school, my first year teaching at a high school, and my first year at the high school where I currently teach. The advice I received at a summer choral directors’ workshop after my first year in the classroom transformed my teaching:

bloom-where-you-are-planted

During my first week at that wonderful middle school, I remember eagerly telling my new principal that I was SO thankful to finally have the opportunity to fulfill the dreams I’d had since I was 14 years old! As excited as I was, a part of me was disappointed because it wasn’t quite the dream job I had envisioned. Although I poured countless hours and energy into that first year, those 5 words, Bloom where you are planted, convicted me.

I couldn’t look at my job as being merely the steppingstone to something I hoped would look more like my dream job. I needed to embrace where I was, make the most of it, and give myself fully to the experience. Once I did that, I breathed more easily. I enjoyed my students even more and grew to love the middle school quirks and energy, I became less conscious of my predecessor’s shadow, and I infused more of my own personality into my teaching.

One of my former choral teachers said that the musician’s life was always about going from one big thing to the next. Concert to concert. And so forth. I believed her for a time. But really, living and teaching are not about those milestones, the concerts, the tests, etc. Living and teaching are about the moments in between. The moments where you connect with students. The moments where learning happens. The moments where the lightbulbs light up, sparkling with understanding.

I look forward to the upcoming school year and all that is familiar and beloved. Yet there is still newness: new faces, new stories, new music, new experiences, new memories to create, and new seeds- of learning, confidence, technique, skills, understanding- to plant. May those seeds bloom where they are been planted. May we all bloom where we are planted.

What’s the best advice you’ve received? How did you transfer it into your teaching?

Teacher Planner

Teacher Planner Covers


One of the first things that I do to prepare for the new school year is to set up my planner.

Once I’ve printed and ordered my pages, I take my planner to my local office supply store and have the front and back covers laminated for durability. Teacher Planner PreviewThe lamination and the spiral binding cost me less than $10.

This year, I also decided to add pockets because I previously used binder clips and paper clips to hold materials in my planner. I love these colorful binder tabs because they complement my color scheme, and I cover them with clear glossy tape for durability.Planner photo

Once I have the planner assembled, I label the dates for my weekly spread, and I add in events from my school district’s calendar, my husband’s work, etc. I like to color code the events using repositionable flags because they’re easy to move when dates change. When I receive my class schedule, I will then label each block with class period and name. As the year progresses, it’s so helpful to keep track of what my students have done and what my future plans entail.

What is the first thing you do to prepare for your new school year? How do you keep track of your lesson plans?

Lesson Learned

When I was a sophomore in high school, I eagerly anticipated the posting of the cast list for the school musical. I thought my audition had gone well (except for my not-so-fabulous dancing skills), and that I might even have a chance of getting a speaking role.

When I didn’t see my name on the list, I was surprised and incredibly disappointed. Trying to be proactive, I went to the drama director’s classroom that week to ask her what I could improve upon for the following year’s audition. I expected she would agree with me about my not-so-fabulous dancing skills. Instead, she paused for a moment before saying,

“You may want to work on your singing.” She said something else about talking with my chorus teacher about perhaps taking a chorus class.

She must have seen the crushed expression on my face because she then asked, as an afterthought, “Are you in chorus?”

“Yes,” I stammered, trying to maintain my composure and not cry. “I’m in Chamber Choir.” Chamber Choir was the school’s 14-member premier choir of the six choirs in the program. I didn’t tell her that I’d also been in All State Chorus or that I’d had the highest audition score of the few hundred students who auditioned for our regional chorus that year.

Her eyes widened as she recognized her blunder, and she said more that I no longer recall. I thanked her and left her classroom as quickly as I could.

Her unintentional comment devastated me. Singing was my life. I already knew I wanted to be a chorus teacher. Could I even consider that now? I was filled with self-doubt. Could I believe the kind words and compliments I had received prior to this moment? My voice was ME. Part of my identity. Who was I, if not a singer?

Voice as Identity

After time had passed, I realized that I had probably caught her off-guard, she likely hadn’t remembered me or my audition, and she had grasped at a possible reason why someone wouldn’t have made the cut. I learned some vital lessons through that experience:

  • Words have the power to wound or uplift. I want my students to feel uplifted and encouraged.
  • Accuracy and honesty are essential when providing constructive feedback. When I discuss how students can improve, I try to frame my feedback in a gentle and clear manner while conveying how we can work together toward the desired outcome.
  • Rejection does not define us. Our response to rejection is how we are measured. I’m still proud of my 15 year old self for seeking constructive feedback in the midst of disappointment, but I wish I hadn’t internalized it to such a degree.
  • Always be prepared to give an answer, even if the answer is that you honestly don’t know the answer. Rubrics for assessments and auditions simplify the grading process and help me be more efficient, but they also help me provide truthful, meaningful feedback to my students.

Lessons Learned

What’s a lesson you learned the hard way that has shaped you as a teacher?

Rhythm Cards

Rhythm Cards thumbnail

When I began teaching at my current school a few years ago, I discovered that my students struggled with differentiating between subdivided beat patterns. Reading and performing these rhythms with sixteenth note and eighth note combinations were intimidating. While rummaging through my personal office supplies at home one day, I discovered many sets of 5×8 index cards and decided to create these rhythm cards for my students to reinforce these rhythmic patterns.

Ideas for learning and/or assessment activities:

1. Display the cards for full-class or individual sight reading.
They can be displayed on the chalk/whiteboard using magnets (these are similar to the ones I bought years ago at the DollarTree which are not available online), on the ledge of the chalkboard or upright piano, on music stands, on the floor, etc.
Note: These are especially handy if you are extracting challenging rhythms from your repertoire to teach in a warm-up with your students before they see the actual music. Post the rhythms, practice, add ties if needed, etc.  If the cards are laminated, you may write the counts with a dry-erase marker and re-use.

2. Composition: This is one of my students’ favorite collaborative activities! Student groups are given a number of cards (4 for 1 measure in 4/4 time, 6 for 2 measures in 3/4 time, etc.) to arrange in the order they prefer, and they must work together to read and perform it.

Suggestions on how to differentiate this activity:

  • Intentional grouping of students and/or assignment of particular rhythms
  • Come up with a “creative” way to present (my students have done dance routines, cheers, body percussion, mock conversations by adding inflection to rhythm speaking, animal noises, etc.)
  • Assign pitches to each note and be prepared to sing your pattern
    (my students use solfege syllables to aid them with this)
  • Assign words to each note and speak the rhythm as a rap

3. Aural recognition and dictation
Students are given a set of cards and must raise the card that matches the rhythm they hear. Determine if your students can distinguish between four 16th notes in a row and another rhythm with an 8th note and two 16th notes pattern. If you speak the rhythm with your counting system, are they successful in identifying it? What if you simply play the rhythm, requiring them to mentally decode the rhythm in order to match what they hear to the visual/tactile manipulative in front of them?

How would you use these rhythm cards in YOUR classroom?

These rhythm cards are available for FREE in my store here. Rhythm-Cards-thumbnailIn addition to the original 5×8 index card size, the rhythm cards are also available 2/page in the standard 8.5 x 11 size. I recommend printing several copies of the cards on cardstock and laminating them for durability.
Note: If you click the “Follow Me” button on my store, you’ll be notified when new products are posted.

I’d love to hear your ideas and feedback! Please share your thoughts in a comment below.


My Why

Have you seen the incredible video featuring Michael Jr. on YouTube? In the brief excerpt from a presentation, Michael demonstrates the importance of knowing why you do something by having an audience member sing. The result is incredibly powerful.

"Know your why" YouTube video

I was moved by this video the first time I saw it during a music-specific professional development session. How fitting for a group of music teachers to see this, I thought. I wonder how I might incorporate this into my classroom.

Less than a month later, my principal shared this same video at our leadership team meeting for all of the department chairs. The same effect was felt by my colleagues. Know your why.

Why do I teach, and more specifically, why do I teach students the art of music?

There are myriad reasons but they all distill to this: I love it.

I love sharing in the joy my students feel when we accomplish something that was challenging for us. I love watching their confidence grow as they blossom into leaders in our class. I love hearing the music they create as their voices and skills develop. I love feeling like I am where I am meant to be, doing what I am meant to do.

What’s your why?